I think it’s understandable that all we could possibly think of is pasta, pizza, and tacos when it comes to great dishes. We’re only human, OK?
However, if you’re currently gluten-free, then you probably think that you have to say goodbye to these goodies. But the truth is, you don’t!
Whether you have Celiac disease, trying to accommodate your guests, or simply need to cut out the gluten for a while, we have a ton of delicious recipes that you will love to try, and they’re all gluten-free!
Plus, you can still eat all the amazing comfort foods like stuffed peppers, Instant Pot pho, and homemade gluten-free pasta, which I think it’s only a win-win situation.
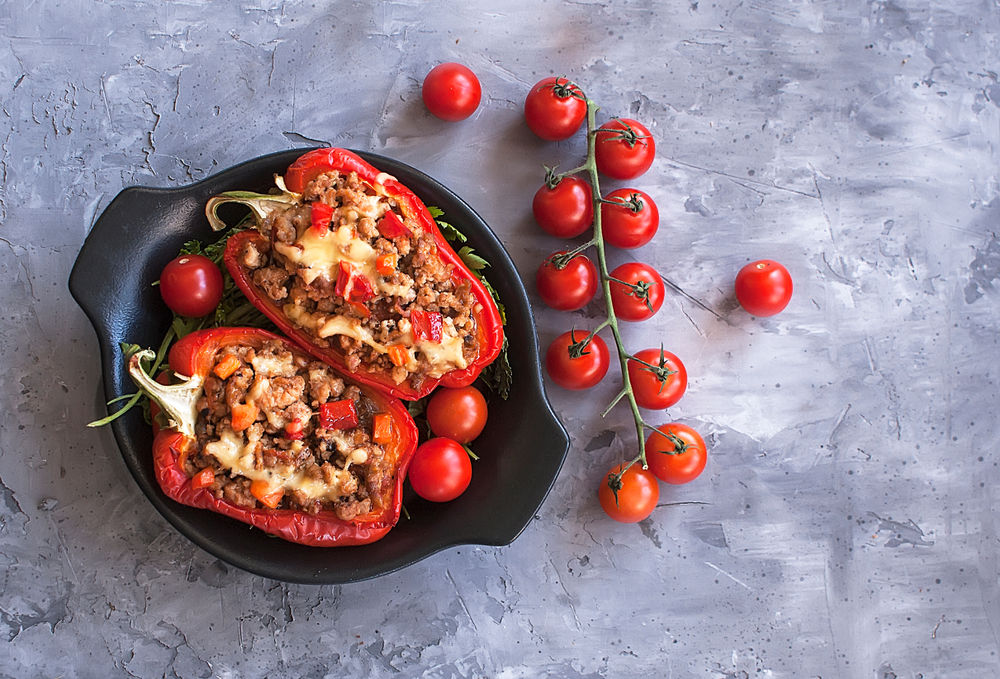
Classic Stuffed Peppers
Bell peppers are actually big enough to hold a lot of food and strong enough to maintain their shape when you cook them in the oven. Plus, they are mild enough to work with any dish. Basically, they’re the perfect vessel for all kinds of tastes.
Ingredients:
- 1/2 c. uncooked rice
- 2 tbsp. extra-virgin olive oil, plus more for drizzling
- 1 medium onion, chopped
- 2 tbsp. tomato paste
- 3 cloves garlic, minced
- 1 lb. ground beef
- 1 (14.5-oz.) can of diced tomatoes
- 1 1/2 teaspoons dried oregano
- Kosher salt
- black pepper
- 6 bell pepper, tops, and cores removed
- 1 c. shredded Monterey jack
- Freshly chopped parsley, for garnish
How to:
- Preheat the oven to 400 degrees. In a small saucepan, prepare the rice as it is written on the package instructions. In a big skillet over medium heat, heat some oil. Cook the onion until it turns often, around 5 minutes. Stir in tomato paste, add the garlic, and cook until you notice its fragrance, around 1 minute or maybe more. Add your ground beef and cook while breaking up the meat with a wooden spoon, until it’s no longer pink, around 6 minutes. Drain the fat.
- Return the beef mixture to a skillet, then stirs in the rice and diced tomatoes. Season with some oregano, salt, and pepper. Let it simmer until the liquid has slightly reduced, around 5 minutes. Place the peppers cut side-up in a baking dish and drizzle with some oil. Spoon your beef mixture into the peppers and top with some cheese, then cover the baking dish with some foil.
- Bake until the peppers are tender, around 35 minutes. Uncover and bake again until the cheese is bubbly, around 10 minutes. Add some parsley on top.
Cauliflower Pizza Crust
Cauliflower is now an all-time favorite. It’s extremely healthy, and it can easily replace mashed potatoes and even toasty bread. But one of the best inventions out there is the cauliflower pizza crust.
Ingredients:
- 1 large head cauliflower, chopped
- 1 big egg
- 2 c. shredded mozzarella, divided
- 1/2 c. freshly grated Parmesan, divided
- salt
- 1/4 c. marinara or pizza sauce
- 2 cloves garlic, carefully minced
- 1 c. grape or cherry tomatoes, halved
- fresh basil
- balsamic glaze, for drizzling
How to:
- Preheat the oven to 425 degrees. In a big skillet, add 1/4 inch of water to a boil, and season with some salt. Add the cauliflower in one layer and cook until it becomes crisp-tender, 3 to 4 minutes. Transfer it to a clean dish towel, and squeeze to drain the water.
- Add the drained cauliflower to your food processor and pulse until it’s grated. Drain all the excess water in some paper towels.
- Transfer drained cauliflower to a big bowl and add egg, 1 cup mozzarella, and 1/4 cup of Parmesan. Again, season everything with salt.
- Transfer your dough onto a baking sheet, lined with some cooking spray, and pat it into a crust. Bake until it’s golden and dried out around 20 minutes. Top the crust with marinara, remaining mozzarella, and Parm, but also the rest of the garlic and tomatoes. Bake until your cheese has fully melted and the crust is crisp, 10 minutes more. Garnish with some basil and drizzle with balsamic glaze.

Saucy Tuscan Butter Shrimp
You might be asking if there’s anything Italian about this recipe. The answer is no. But if you’re also wondering how tasty is this recipe, I can assure you won’t resist eating straight out of the pan. In fact, I BET on it!
Ingredients:
- 2 tablespoons extra-virgin olive oil
- 1 lb. shrimp, peeled, deveined, and tails removed
- Kosher salt
- freshly ground black pepper
- 3 tablespoon butter
- 3 cloves garlic, minced
- 1 1/2 c. halved cherry tomatoes
- 3 c. baby spinach
How to:
- In a big skillet over medium-high heat, prepare the oil. Season the shrimp everywhere with salt and pepper. When the oil starts to shimmer but isn’t smoking, add some shrimp and sear until the underside is golden around 2 minutes. Then flip until it’s opaque. Remove from the skillet and set aside.
- Reduce the flame to medium and add some butter. When the butter has melted, stir in some garlic and cook until you notice its fragrance, around 1 minute. Add some cherry tomatoes and season with some salt and pepper. Cook until you see the tomatoes bursting, then add some spinach and cook until the spinach is starting to wilt.
- Stir in some heavy cream, Parmesan, and basil, and bring everything to a simmer. Reduce the heat to low, and keep on simmering until the sauce is slightly reduced around 3 minutes.
- Return your shrimp to the skillet and stir to combine everything. Cook until the shrimp is completely heated through, garnish with more basil and squeeze the lemon on top before serving.
Best-Ever Gluten-Free Pasta
No, you’re not dreaming: you can actually make gluten-free pasta from scratch, and it’s super easy!
Ingredients:
- 2 1/3 c. gluten-free flour, like Cup4Cup
- 2 teaspoon xanthan gum
- 1 teaspoon kosher salt
- 5 large eggs
How to:
- In a big bowl, whisk together some gluten-free flour, xanthan gum, and some salt.
- Make a big well right in the middle of your flour mixture and add some eggs. Using a fork, beat your eggs until they’re fully mixed, then slowly integrate the flour into the eggs, until there’s no dry flour left, and you have a ball of dough. (You might have to switch from a fork to your hands when you’re getting closer to the end of the mixing process.)
- Turn the dough out onto a lightly floured surface, and knead until it’s become smooth for 2 to 3 minutes.
- Cut the dough into quarters and wrap all but one in plastic wrap. On a floured surface, roll the uncovered dough into a long rectangle. Set some pasta maker to the widest setting and pass the rolled-out dough through 2 times. Fold the short ends of your dough to make them meet in the center of the rectangle, then fold in half so the dough is in quarters. Roll out again until the dough is 1/4″ thick, then pass through the pasta maker again at least 2 more times.
- Adjust the pasta maker to become 1 degree more narrow and repeat the process. Continue rolling, folding, and adjusting until you reach the desired thickness. The dough should be slightly translucent. Place the rolled-out dough on a floured surface and dust with more flour. Repeat the process with the remaining dough quarters.
- Adjust the pasta maker to the width you want and feed the dough through the machine. Divide noodles into equally sized portions and curl them into nests. Place on a parchment-lined baking sheet and use a clean kitchen towel to cover until it’s ready to be cooked.
- To cook: bring a pot of some salted water to a boil and add some pasta. Boil, while you occasionally stir with a wooden spoon, until it’s tender, 2 to 3 minutes.
- Drain it and serve with your favorite pasta sauce.
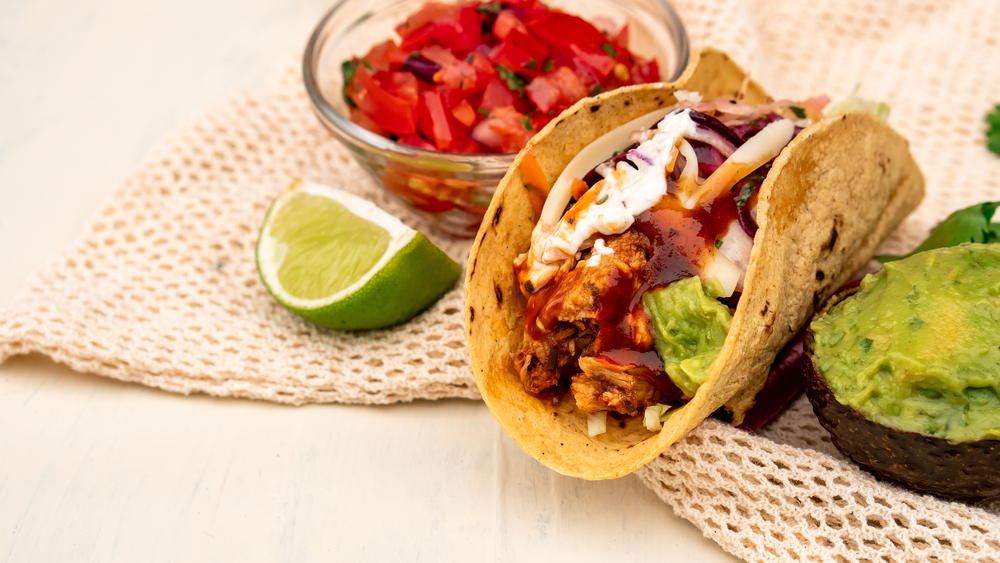
Crispy Chipotle Chicken Tacos
These tacos are extra crispy on the outside, and super cheesy on the inside (like many of us are!). They’re so much fun to eat!
Ingredients:
- For the avocado ranch sauce: 1 avocado
- 1 jalapeño, seeded and chopped
- 2 cloves garlic
- 1/2 c. packed fresh cilantro
- 1/4 c. buttermilk
- 1/4 c. sour cream
- the juice from 1 lime
- Kosher salt
- Freshly ground black pepper
- Tacos: 1 tablespoon extra-virgin olive oil
- 1 medium yellow onion, chopped
- 3 cloves garlic, minced
- 1 lb. ground chicken
- 1 chipotle chile in adobo sauce, chopped, plus tablespoons adobo sauce
- 1 teaspoon chili powder
- 1 teaspoon cumin
- Kosher salt
- Freshly ground black pepper
- 3 c. shredded cheddar, divided
- 8 small corn tortillas
- Fresh cilantro leaves
How to:
- Cook the avocado ranch sauce: in a food processor or blender, mix the avocado, jalapeño, garlic, cilantro, buttermilk, sour cream, but also lime juice. Blend until everything turns smooth, then season with some salt and pepper.
- Put your sauce in an airtight container, and refrigerate until you’ll use it. Sauces can be made up to 3 days ahead, and they can be easily refrigerated!
- Cook the tacos: In a big skillet, heat some oil. Add your onion and cook, while stirring occasionally, until it softens, around 5 minutes. Add some garlic and cook, until it becomes fragrant, around 1 minute or more. Include the chicken and cook, breaking up the meat by using a wooden spoon, until it’s no longer pink, for 8 minutes. Add the chipotle chile, adobo sauce, chili powder, and cumin. Season everything with salt and pepper, then remove from the heat. In a small nonstick skillet, arrange 1/4 cup of cheese in a circle in an even layer, approximately the size of your tortillas. Place a tortilla on top, spoon some chicken filling on one half of the tortilla and 2 tbsp cheese on the other half. Keep on cooking until the cheese on the bottom is crispy, around 4 minutes. Take a rubber spatula, fold in half with the cheese side up and over the chicken, pressing to help the taco remain close. Cook until it’s warmed through, for 1 minute, then flip and keep on cooking until the other side is warmed through, for 1 minute. Transfer it to a plate, and repeat the steps with the rest of the tacos. Top with cilantro and avocado ranch.
If you enjoyed reading this article, we also recommend reading: Dealing with a Hangover? 12 Foods to Eat to Feel Better